If you already tried resetting your device to factory default values
with the reset button and you can't access the unit, we recommend that
you perform a TFTP recovery.
Note: The firmware used is dependent on the
firmware compatible with the product..
Steps
Requirements:
- A narrow tool to press down reset button (like the pin of a headset or paper clip).
- TFTP client running on PC
- Latest AirOS firmware file (you can download it from http://www.ubnt.com/download)
Note: this guide refers to a PC running Windows, but is easly applicable to any other OS.
IMPORTANT!
- Do not switch off, do not reboot and do not disconnect the device from the power supply during the firmware upgrade process, as these actions will damage the device!
Recovery procedure
Windows Users
- Make sure that radio responds to pings (perform a ping 192.168.1.20 from a DOS window), if it does not, go back to the first step.


- First, power off the device.
- Configure your computer: Windows PC's Ethernet must be configured manually with the following settings (under Network Connections):
IP Address: 192.168.1.254, Subnet Mask : 255.255.255.0 - Connect your radio to the PC.
- Begin by pressing the reset button. Keep holding, then power the unit on. Wait 8 seconds then release the button (if you want to reset the unit to factory defaults, wait about 15 seconds or until the signal LEDs light up to indicate that the device is ready for recovery.)
- Upload firmware image file .bin to 192.168.1.20, using a TFTP client software (binary mode). Windows integrated command line TFTP client or download a third party utility to upload the AirOS firmware. Below are two examples:

- Windows Alternative 1: From Windows PC, you can use TFTP command line from a DOS window (START>>>CMD):
Go into the same directory structure as the firmware (e.g., assuming that you have stored the image files in c:\firmware directory, type the command :cd c:\firmware) and enter the following (for help type TFTP -h) , e.g.:
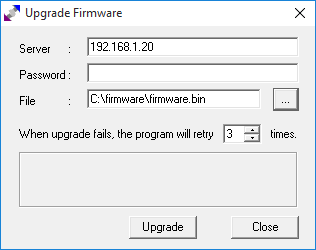
tftp -i 192.168.1.20 put XS2.ar2316.v3.4-rc.4351.090504.2146.bin - Windows Alternative 2: Download and execute tftp2 and configure it as in the image to upgrade.
- Signal LEDs will keep blinking one by one in 4 different colors during firmware upgrade. Wait for about 7-10 minutes (devices and firmware depending) - do not power off the device during the procedure!


Linux Users
Generic Linux distributions have an integrated command line TFTP
client. From a PC running Linux, you can upload via TFTP by typing into
Terminal the following commands:
root@ubuntu:tftp 192.168.1.20
tftp> bin
tftp> trace
tftp> put XS2.ar2316.v3.4-rc.4351.090504.2146.bin
Sent 1965199 bytes in 35.2 seconds
tftp> exit
No comments :
Post a Comment